
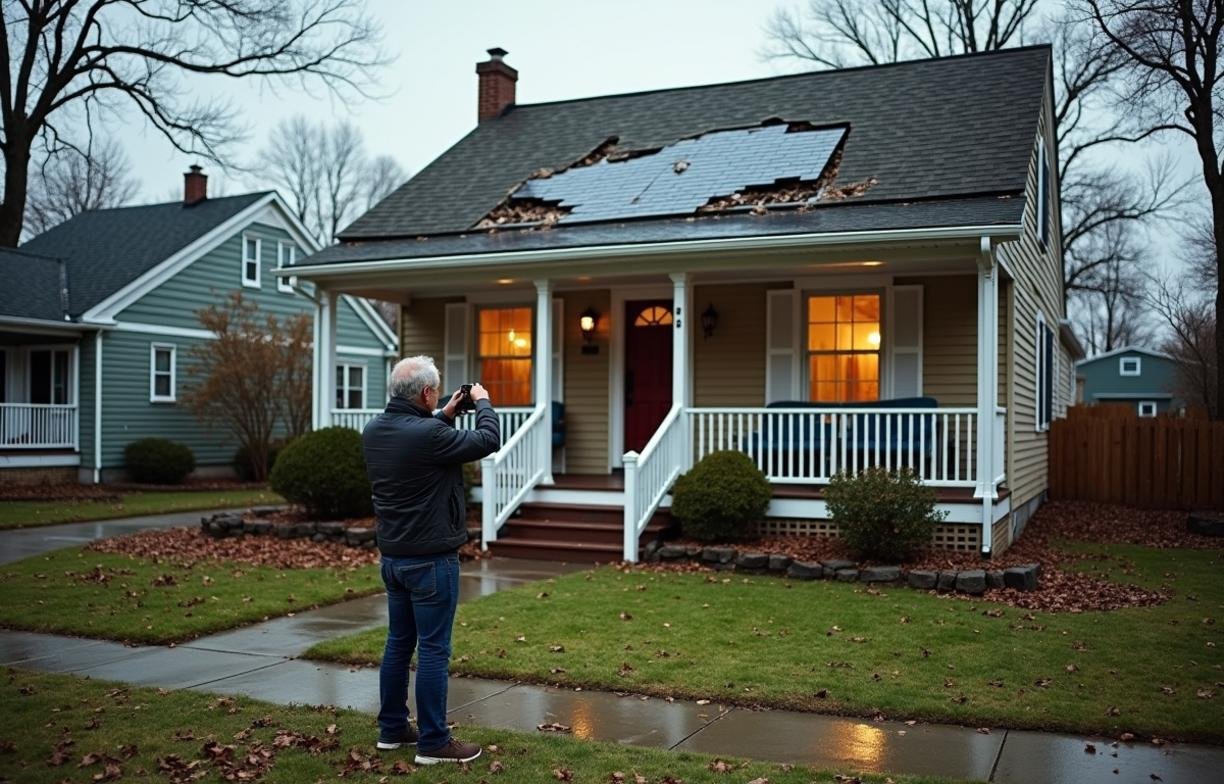
Storm damage insurance claims are strongest when damage is documented before debris removal or demolition begins. After wind, hail, lightning, or wind-driven rain, your first job is to make the property safe enough to photograph without changing more than necessary.
Insurance adjusters need proof of what happened, when it happened, and which parts of the property were affected. The key is to capture a clear record before cleanup hides impact marks, water lines, fallen-limb patterns, or roof debris paths.
Start with safety, but preserve the evidence
Do not enter a building with sagging ceilings, standing water near outlets, a gas smell, or visible structural shifting. FEMA advises avoiding floodwater contact because it can contain sewage, chemicals, sharp debris, and energized hazards after severe storms.
If a tree has punctured the roof, photograph it from outside first. Get the trunk, broken limbs, roof opening, gutters, and where the tree came from. Then take interior photos of ceiling stains, wet insulation, collapsed drywall, and damaged contents before anything is moved.
Use temporary measures only to prevent more damage. Most homeowners policies require reasonable steps to protect the property after a loss. That usually means tarping a roof opening, boarding a broken window, or extracting standing water after photos and video are taken.
A tarp can hide shingle bruising, punctures, lifted flashing, and granule wash patterns. Before it goes on, take close photos and wide photos from the ground, ladder, attic, and interior rooms if safe.
Photograph in a sequence an adjuster can follow
Take photos like you are building a map. Start at the street, then move closer. Include the house number, all four sides of the structure, the roofline, the yard, detached structures, and damaged trees.
Use three distances for each damaged area: wide, medium, and close. A wide shot shows location. A medium shot shows the affected component. A close shot shows the damage itself.
For scale, place a ruler, tape measure, coin, or chalk mark next to dents, cracks, holes, and water lines. Hail dents on soft metal can be easier to verify when photographed beside a ruler showing diameter, such as 1 inch or 1.5 inches.
What to capture outside
Photograph roof slopes from the ground if you cannot safely access the roof. Capture missing shingles, lifted tabs, exposed underlayment, ridge-cap damage, bent vents, cracked skylights, displaced flashing, dented gutters, and granule piles at downspout exits.
The Insurance Institute for Business & Home Safety notes that roof damage often begins when wind gets under the roof edge, and that openings such as windows, doors, garage doors, and attic vents are common entry points for storm pressure and rain. Those areas deserve extra photos after a storm with strong gusts.
Also document fences, sheds, AC condensers, solar equipment, pools, retaining walls, and detached garages. Many policies treat detached structures under a separate coverage limit, often called Coverage B.
What to capture inside
Inside, photograph stains before wiping or cutting anything. Measure water lines on drywall from the floor, especially in basements, garages, and first-floor rooms.
Open closets, cabinets, and attic access points if safe. Water often travels along framing, ducts, recessed lights, and ceiling joists before appearing far from the roof opening.
Take video while narrating dates, rooms, odors, and what you see. Say, “This is the upstairs hallway at 8:40 a.m. on May 9,” then pan slowly. Fast video often becomes useless during claim review.
Record time, weather, and cause details
Write down when the storm began, when damage was first noticed, and when you contacted the insurer. Many policies require “prompt notice,” and some states allow shorter deadlines for certain wind or hail claims.
Pull storm data from authoritative sources. The National Weather Service publishes local storm reports, wind gusts, tornado paths, hail size, rainfall totals, and warnings. Save screenshots or PDFs showing your address area and the date.
If hail is involved, record the largest hail you personally observed, but avoid guessing if you did not see it fall. The NOAA Storm Prediction Center uses public and trained-spotter reports, and hail size is often described in inches, such as 1.00-inch quarter-size hail.
For wind, note whether damage was directional. For example, all missing shingles on the west-facing slope may align with a recorded west wind gust. That detail can matter when an adjuster separates storm damage from age-related wear.
Do not say the roof “needs replacement” unless a qualified person has inspected it. Say what you can verify: shingles are missing, flashing is bent, water entered the attic, or drywall collapsed in the bedroom.
Make an inventory before throwing items away
Do not drag ruined furniture, rugs, electronics, tools, or food to the curb until each item is photographed. If local officials require disposal for sanitation, document the order or notice and photograph items in place first.
For each damaged item, record the brand, model, serial number, approximate age, purchase location, and visible damage. Electronics often have labels on the back or underside. Appliances usually have model tags inside doors or on rear panels.
Keep a room-by-room inventory. A spreadsheet helps, but a notebook works if it captures the same facts. Include “living room sofa, gray fabric, purchased 2021, water soaked 8 inches up from floor,” rather than “sofa ruined.”
The National Association of Insurance Commissioners recommends maintaining a home inventory because it speeds claim review and supports personal property valuation. After a storm, you are recreating that inventory under pressure.
If food spoiled after a power outage, photograph the refrigerator thermometer if available. The USDA says refrigerated food is unsafe after more than 4 hours without power if the door stayed closed and temperatures rose above 40°F.
Decide what to do yourself and what needs a pro
Some documentation is simple. Some requires a contractor, roofer, engineer, hygienist, or public adjuster. The right choice depends on safety, damage type, and whether the insurer disputes cause.
| Situation | Best first move | Why it fits |
|---|---|---|
| A few missing shingles visible from ground | Photograph, tarp if needed, report claim | Evidence is visible and risk may be limited |
| Water dripping through ceilings | Photos, stop active intrusion, call mitigation company | Wet drywall can collapse and spread moisture quickly |
| Tree on roof or wall | Photograph from safe distance, call emergency tree/removal contractor | Load paths and punctures may create structural hazards |
| Hail dents on gutters but roof uncertain | Ground photos, roofer inspection before repairs | Soft metal dents can support hail timing and direction |
| Foundation cracks or wall movement | Avoid entry, request structural evaluation | Movement can worsen during cleanup or debris removal |
| Insurer says damage is wear and tear | Get a written contractor opinion with photos | Claim decisions often turn on cause, not just condition |
A moisture meter can help locate wet areas behind drywall and trim. Basic pin-type meters read moisture content in materials such as wood, while restoration contractors often use non-invasive meters and thermal imaging.
Hire a mitigation company when water has affected multiple rooms, ceilings, insulation, or HVAC cavities. The Institute of Inspection Cleaning and Restoration Certification publishes the IICRC S500 standard, widely used for professional water damage restoration methods.
A public adjuster may help when damage is extensive, policy language is disputed, or the first estimate misses major areas. In many states, public adjuster fees commonly run 5% to 15% of the insurance settlement, so the claim size must justify the fee.
Protect damaged areas without destroying proof
Insurance policies generally expect you to prevent additional damage. That does not mean you must complete permanent repairs before the insurer sees the loss.
Temporary repairs should be photographed before, during, and after the work. Save tarp packaging, emergency invoices, contractor notes, moisture readings, and disposal receipts. If a contractor removes soaked drywall, photograph the wall before removal and the exposed cavity afterward.
Mark damaged materials before removing them. Blue painter’s tape can outline wet drywall, cracked siding, or ceiling stains. On floors, photograph the water line against baseboards before pulling carpet.
Do not discard broken roofing, siding, flooring, or pipe sections immediately if the cause is unclear. Place small samples in labeled bags. Write the room, date, and location on the bag, such as “north bedroom ceiling drywall, removed June 3.”
When cleanup must happen immediately
Cleanup should not wait if there is sewage, unsafe electrical exposure, active rain entering the house, or a local health order. In those cases, take the best photos possible and then act.
For water damage, time matters. The U.S. Environmental Protection Agency states that mold may begin growing on damp materials within 24 to 48 hours. That makes quick drying important after the initial photo record.
If emergency workers or utility crews remove materials, record their agency, badge number if offered, work time, and what was removed. A short video of the crew’s work area can fill gaps later.
Build a claim file the insurer can audit
Create one digital folder for the claim. Use subfolders named “photos before cleanup,” “videos,” “receipts,” “weather reports,” “contractor estimates,” and “insurer communications.”
Do not rename every image “damage.” Use names that help later, such as “kitchen-ceiling-stain-before-dryout-2026-04-18.” Most phones store metadata, but renamed copies make adjuster review easier.
Keep a communication log. Record the date, person, company, phone number, and what was said. If an adjuster gives instructions by phone, send a short follow-up email confirming your understanding.
Ask contractors for line-item estimates, not lump sums. A useful estimate lists quantities, material types, room dimensions, labor tasks, and whether work is temporary or permanent. For example, “remove and replace 64 square feet of wet ceiling drywall” is clearer than “repair ceiling.”
If you submit photos through an insurer app, keep your own copies. Claim portals can compress images, strip metadata, or make downloads difficult after the claim closes.
Avoid documentation mistakes that weaken claims
Do not make permanent repairs before the insurer has had a reasonable chance to inspect, unless delay would cause more damage or create danger. If you must proceed, document why.
Avoid cleaning impact evidence too early. Pressure washing siding can remove shingle granules, scuff patterns, dirt shadows, and hail impact marks on oxidized surfaces.
Do not let contractors mark every roof blemish as storm damage without explanation. Adjusters distinguish hail fractures, blistering, footfall damage, manufacturing defects, nail pops, and old mechanical damage.
Be careful with social media posts. A casual caption like “finally replacing our old roof” can create confusion if the claim is actually for sudden storm damage. Use factual language in all written communication.
Never exaggerate dates, quantities, or causes. A strong file depends on consistency between photos, weather data, contractor notes, and your timeline.